 |
How
to make a leather handled knife
The leather you use should ideally be 4-4.5mm thick, I usually use
thick shoulder leather. It will be compressed to some extent, so
you don’t want it to be too thin. It is best to sand off the glossy
side of the leather before you make it in to a handle. This isn’t
essential, but it improves the line of the finished handle.
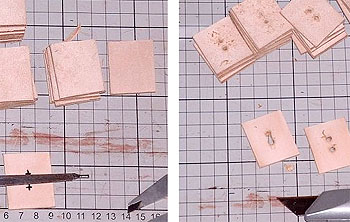
Cut the leather into small rectangles of about 35mm x 25mm.
Draw in the centreline and use the tang itself
(or a calliper measurement) to mark the position of the hole, so
that it falls 1mm or so either side of the top and bottom faces
of the tang (Fig 6). Each piece of leather should be made to
fit the tang in the position that it will sit.
|
 |
The tang on this knife was just over 3mm thick, so I used a 4mm
drill bit to punch in holes at the top and bottom of the proposed
slot, then cut the remainder out with a sharp knife. If you do
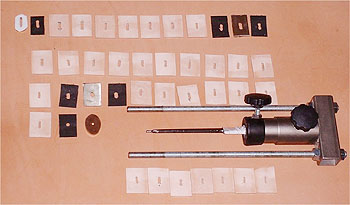
this sloppily, just drilling a big hole in the middle of them all,
and pushing them on you will regret it later, when the sections
start to slip and rotate. This is a 35 piece handle, each section
requires careful attention. You only need one piece to be out of
line or twisted around to cause problems. As soon as you have
marked the leather pieces for drilling, it is important to develop
a system to keep them in order. After drilling and cutting, I gently
buzz them with a barrel sander to smooth the faces.
|
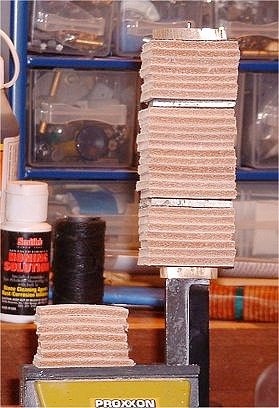 |
Make sure that you test assemble the handle several times under
tension in your clamp. I used the clamp sold here in the tools
section, but you could make your own, look at the Saami knife
tutorial for ideas. If you are using spacers, make them symmetrical,
in other words, if you have 8 leather pieces between the bolster
and first spacer, there should be the same number between the back
spacer and the butt cap. The small pile of spares is are important
for two reasons: Firstly because you are likely to mess up one or
two pieces during the gluing process, throw that piece away, because
it is probably covered with epoxy and will make a mess. Move on to
the next piece, it will still fit and you can use pieces from the
spares pile to fill in at the end. Secondly, these “spares” will
be glued together to form your practice block. This is an absolutely
essential part of the process.
|
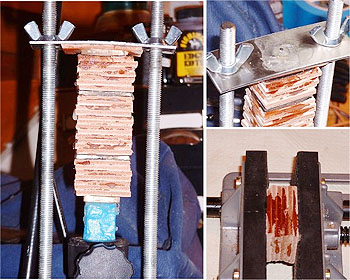 |
Before you do the final assembly, tape the blade and grease the top
of the blade and the front of the bolster with Vaseline; this prevents
the epoxy from getting where you don’t want it! Assemble the handle
one piece at a time, applying only a small smear of 24hr epoxy all
around the skin side of the leather, then press it down firmly on
to the pile. Don’t saturate the leather with epoxy, just lightly
glue the pieces together and to the tang. Fix the top clamp bar
in place and compress the pile. Don’t try to squeeze the life out
of it, you should compress the pile down about two or three thicknesses
of leather. Fill the top hole with Vaseline, again this prevents any
epoxy that might squeeze out from causing grief. Very little glue
should come out under compression, this is not a messy process if you
do it properly. The spare pieces of leather should be clamped to make
your practice block for finishing.
|
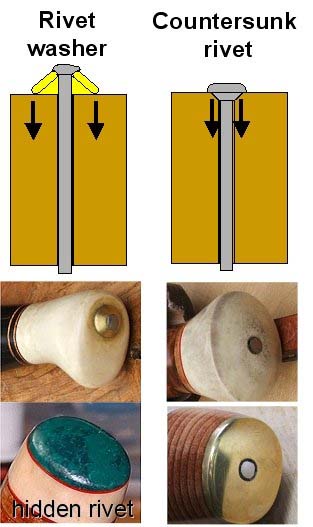 |
You will need to rivet the knife tang to the butt cap. Rivet washers
are the easiest to set and make the strongest form of rivet, because
they press over a greater surface area. They are essential if you are
riveting into soft antler marrow, but rosencrans, any decent hardwood
or metal will take a simple rivet, or a flush countersunk rivet. For
a thick metal butt-cap, I would usually countersink the rivet, but in
this project I am using a rivet washer to show how it works. Both are
formed in the same way by even tapping with the round face of a ball
pein hammer directly to the centre of the tang-end. If you do use a
simple rivet, countersink the butt-cap slightly.
|